DIY Flower Vase Hydro Dipping for Shavuos with Mushky Yiftach
Just in time for Shavuos, popular craft creator Mushky Yiftach of On a Roll Crafts has released a vibrant and easy-to-follow YouTube tutorial on how to create a stunning marbled vase using the hydro dipping technique—perfect for enhancing your Yom Tov table with a personal touch.
In the video, Mushky guides viewers through each step of this mesmerizing process that transforms a plain vase into a dazzling floral centerpiece, using only a few household supplies and a bit of creativity.
Whether you're decorating for Shavuos or looking for a fun family project, this craft is kid-friendly, budget-friendly, and bursting with color.
Watch the full tutorial below.
Showing posts with label OnArollCrafts. Show all posts
Showing posts with label OnArollCrafts. Show all posts
Saturday, May 31, 2025

Saturday, January 27, 2024
Tu B'shvat - Where Fruit Meets Fashion
Tu B'shvat was just here. Here is a great way to make the fruit look even more enticing! Not only will you get to enjoy healthy fruit, but you'll also become a fashionista in the process!
Supplies:
Plate
Scissor
Clementines
Picture of you!
Step 1:Print out a picture of yours truly
Step 2: Cut out around the picture
Step 3: Peel the clementine aiming to keep large pieces of the peel intact
Step 4: Use the peel and the actual pieces of the orange to let your creativity shine as you form a beautiful dress!
Step 5: Take a moment to marvel at the delicious fashion statement you created!
Step 6: Now that your masterpiece is complete, it's time to relish the sweet fruit's delicious taste.
Mushky, aka the Duct Tape Lady is a craft enthusiast and imagineer. With 15 years of classroom experience, she recognizes that crafts build confidence, teach problem-solving skills, and encourage out-of-the-box thinking. Combining her love for children, education, and creativity, she runs events at camps, schools, parties, and venues of all sorts, creating a warm, enriching and fun environment where children feel safe to explore and grow their creativity. Mushky is the founder of Parsha Pop Up, currently used in over 60 schools, and the creator of On a Roll Crafts.
You can check out more awesome projects on the new website, onarollcrafts.com, YouTube channel: OnARollCrafts, and Instagram.
Bookings for live and virtual workshops, parties and sponsorship, email: info@onarollcrafts.com
Supplies:
Plate
Scissor
Clementines
Picture of you!
Step 1:Print out a picture of yours truly
Step 2: Cut out around the picture
Step 3: Peel the clementine aiming to keep large pieces of the peel intact
Step 4: Use the peel and the actual pieces of the orange to let your creativity shine as you form a beautiful dress!
Step 5: Take a moment to marvel at the delicious fashion statement you created!
Step 6: Now that your masterpiece is complete, it's time to relish the sweet fruit's delicious taste.
Mushky, aka the Duct Tape Lady is a craft enthusiast and imagineer. With 15 years of classroom experience, she recognizes that crafts build confidence, teach problem-solving skills, and encourage out-of-the-box thinking. Combining her love for children, education, and creativity, she runs events at camps, schools, parties, and venues of all sorts, creating a warm, enriching and fun environment where children feel safe to explore and grow their creativity. Mushky is the founder of Parsha Pop Up, currently used in over 60 schools, and the creator of On a Roll Crafts.
You can check out more awesome projects on the new website, onarollcrafts.com, YouTube channel: OnARollCrafts, and Instagram.
Bookings for live and virtual workshops, parties and sponsorship, email: info@onarollcrafts.com
Thursday, October 19, 2023
Rainbow Crafts with Morah Ester and Morah Mushky
Today, we're diving into the colorful world of creativity as we explore a rainbow craft inspired by the timeless story from Parshas Noach. Prepare to be amazed as an entire bubble rainbow forms from soap, water, food coloring, and a cloth!
Supplies:
Food coloring
Cup
Dish soap (not detergent)
Water Dishcloth/Sock
Rubber band/
Ponytail
Plate/ Bowl
Spoon Step 1: Place 2 teaspoons of dish soap in the bowl/ plate
Step 2: Pour 1/2 cup of water into the bowl and mix
Step 3: Make a hole in the bottom of the cup
Step 4: Lay the washcloth or sock on the opening of the cup and wrap the ponytail around both the washcloth and the cup.
Step 5: Create colorful dots from food coloring around the washcloth.
Step 6: place the cup in the soapy water for 5 seconds
Step 7. Blow as hard as you can into the hole in the cup to form a magnificent bubble rainbow
Mushky, aka the Duct Tape Lady is a craft enthusiast and imagineer. With 15 years of classroom experience, she recognizes that crafts build confidence, teach problem-solving skills, and encourage out-of-the-box thinking. Combining her love for children, education, and creativity, she runs events at camps, schools, parties, and venues of all sorts, creating a warm, enriching and fun environment where children feel safe to explore and grow their creativity. Mushky is the founder of Parsha Pop Up, currently used in over 60 schools, and the creator of On a Roll Crafts.
You can check out more awesome projects on the new website, onarollcrafts.com, YouTube channel: OnARollCrafts, and Instagram.
Bookings for live and virtual workshops, parties and sponsorship, email: info@onarollcrafts.com
Supplies:
Food coloring
Cup
Dish soap (not detergent)
Water Dishcloth/Sock
Rubber band/
Ponytail
Plate/ Bowl
Spoon Step 1: Place 2 teaspoons of dish soap in the bowl/ plate
Step 2: Pour 1/2 cup of water into the bowl and mix
Step 3: Make a hole in the bottom of the cup
Step 4: Lay the washcloth or sock on the opening of the cup and wrap the ponytail around both the washcloth and the cup.
Step 5: Create colorful dots from food coloring around the washcloth.
Step 6: place the cup in the soapy water for 5 seconds
Step 7. Blow as hard as you can into the hole in the cup to form a magnificent bubble rainbow
Mushky, aka the Duct Tape Lady is a craft enthusiast and imagineer. With 15 years of classroom experience, she recognizes that crafts build confidence, teach problem-solving skills, and encourage out-of-the-box thinking. Combining her love for children, education, and creativity, she runs events at camps, schools, parties, and venues of all sorts, creating a warm, enriching and fun environment where children feel safe to explore and grow their creativity. Mushky is the founder of Parsha Pop Up, currently used in over 60 schools, and the creator of On a Roll Crafts.
You can check out more awesome projects on the new website, onarollcrafts.com, YouTube channel: OnARollCrafts, and Instagram.
Bookings for live and virtual workshops, parties and sponsorship, email: info@onarollcrafts.com
Tuesday, June 20, 2023
Parsha Pop-Up Curriculum for Camps

Accompanying each craft is a Dvar Torah, a concise and meaningful Torah insight connected to the Parsha. Mushky Yiftach's Divrei Torah are carefully crafted to be age-appropriate, ensuring that campers grasp the underlying lessons and messages contained within the weekly Torah portions.

The Parsha Pop-Up Curriculum has been wildly successful as a tool for teaching parsha in school and the adaptation for camps is sure to inspire day and overnight campers alike.
Acclaim from parents, teachers and principals have indicated that Parsha Pop-Up has quickly become the highlight of the week in their schools, houses and classrooms. This is what parents, teachers and principals are saying about Parsha Pop-Up.
"We consider ourselves very blessed to be a part of this amazing curriculum. Finally! A way to teach Parsha that is not only fun and interactive, but a weekly project that has become the highlight of our week in 2nd Grade and the envy of the school”
- Rabbi Rosenfeld, Teacher of 2nd Grade- Esforme Hebrew Academy, Ormond Beach, Florida
Sunday, May 21, 2023
Painting Flowers With Just A Plastic Bag
Shavuos is right around the corner! Flower paintings are undeniably beautiful but can also be quite complex to create. But, what if I were to share with you a special trick for painting flowers using a ziplock bag?
Supplies:
Canvas
Acrylic paint
Soft ziplock bag
Paintbrush
Step 1: Take a soft ziplock bag and blow it up like a balloon. Twist the bag to form a corner.
Step 2: Paint the corner of the ziplock bag your desired color. Make sure your paint covers the entire corner of the bag.
Step 3: Gently press the painted corner of the bag onto the canvas. The paint should transfer onto the canvas creating a beautiful rose.
Step 4: Repeat steps 1-4 to create additional flowers on your canvas!
Step 5: Using a paintbrush add steps and leaves to complete your painting!
Step 6: Subscribe to "OnARollCrafts" on youtube for more awesome craft content!
Mushky, aka the Duct Tape Lady is a craft enthusiast and imagineer. With 15 years of classroom experience, she recognizes that crafts build confidence, teach problem-solving skills, and encourage out-of-the-box thinking. Combining her love for children, education, and creativity, she runs events at camps, schools, parties, and venues of all sorts, creating a warm, enriching and fun environment where children feel safe to explore and grow their creativity. Mushky is the founder of Parsha Pop Up, currently used in over 60 schools, and the creator of On a Roll Crafts.
Supplies:
Canvas
Acrylic paint
Soft ziplock bag
Paintbrush
Step 1: Take a soft ziplock bag and blow it up like a balloon. Twist the bag to form a corner.
Step 2: Paint the corner of the ziplock bag your desired color. Make sure your paint covers the entire corner of the bag.
Step 3: Gently press the painted corner of the bag onto the canvas. The paint should transfer onto the canvas creating a beautiful rose.
Step 4: Repeat steps 1-4 to create additional flowers on your canvas!
Step 5: Using a paintbrush add steps and leaves to complete your painting!
Step 6: Subscribe to "OnARollCrafts" on youtube for more awesome craft content!
Mushky, aka the Duct Tape Lady is a craft enthusiast and imagineer. With 15 years of classroom experience, she recognizes that crafts build confidence, teach problem-solving skills, and encourage out-of-the-box thinking. Combining her love for children, education, and creativity, she runs events at camps, schools, parties, and venues of all sorts, creating a warm, enriching and fun environment where children feel safe to explore and grow their creativity. Mushky is the founder of Parsha Pop Up, currently used in over 60 schools, and the creator of On a Roll Crafts.
You can check out more awesome projects on the
Bookings for live and virtual workshops, parties and sponsorship, email: info@onarollcrafts.com
Thursday, May 11, 2023
3D Flower Canvas | Flower Craft
With Shavuos right around the corner, we want to decorate and adorn our home with as many flowers as possible. This 3D flower canvas is the perfect thing to elevate any wall or home!
Supplies:
-canvas
-flowers with stem
-paint/sharpie
-vase stencil
-paintbrush
-scissor
-tape
Step 1: Using the vase stencil, outline a vase onto your canvas.
Step 2: With paint or sharpie decorate the vase with your desired look
Step 3: Cut a slit on top of the vase using a scissor or a razor (Yes! Cut the canvas!
Step 4: Place the flowers into the slit to for a beautiful floral arrangement
Step 5: Tape the stems in the back to keep them in place
Step 6: Enjoy your beautiful floral display!
Step 7: Subscribe to "Onarollcafts" on youtube for more awesome craft content!
Supplies:
-canvas
-flowers with stem
-paint/sharpie
-vase stencil
-paintbrush
-scissor
-tape
Step 1: Using the vase stencil, outline a vase onto your canvas.
Step 2: With paint or sharpie decorate the vase with your desired look
Step 3: Cut a slit on top of the vase using a scissor or a razor (Yes! Cut the canvas!
Step 4: Place the flowers into the slit to for a beautiful floral arrangement
Step 5: Tape the stems in the back to keep them in place
Step 6: Enjoy your beautiful floral display!
Step 7: Subscribe to "Onarollcafts" on youtube for more awesome craft content!
You can check out more awesome projects on the
New website, onarollcrafts.com,
YouTube channel, OnARollCrafts,
Follow on Instagram.
Bookings for live and virtual workshops, parties and sponsorship, email: info@onarollcrafts.com
Sunday, April 30, 2023
A Birthday Card that Pops!
Is there a birthday coming up? Are you looking to create a truly memorable birthday card for your friend or family member? Look no further than our DIY pop-up birthday card tutorial! Join Mushky as she walks you through the simple steps to create a stunning and unique pop-up present box card in less than 10 minutes.
With just a few basic materials you can create a personalized and impressive card that is sure to leave a lasting impression. Mushky will guide you through each step of the process, sharing helpful tips and tricks along the way to ensure your card is picture-perfect.
Whether you're a beginner or an experienced crafter, our tutorial is designed to help you add a personal touch to your birthday greetings. Show your loved ones how much you care with a handmade card that truly pops! Don't forget to like, comment, and subscribe for more fun and creative crafting ideas.
Supplies:
-2 colored card stock papers
-scissor
-glue
-markers
-stickers (optional)
Step 1: Fold 1 paper in half
Step 2: Cut 2 slits on the folded edge of the paper, approx 2 inches long and 2 inches apart
Step 3: Pop out the square to form a pop-up
Step 4: Cover the square with a different color paper to make it stand out
Step 5: Cut and paste 2 thin strips of colored paper to form a "ribbon" on top of your gift box
Step 6: To form a bow, either glue a pre-made bow or ribbon or create one using colored paper
Step 7: Write "Happy Birthday" using markers or stickers. You can also add other designs or decorations as desired.
Step 8: Glue the 2nd paper to the back of the pop up card to cover the slits and create a clean finish.
Step 9: Don' forget to subscribe to "onarollcrafts" for more awesome craft content!
Mushky, aka the Duct Tape Lady is a craft enthusiast and imagineer. With 15 years of classroom experience, she recognizes that crafts build confidence, teach problem-solving skills, and encourage out-of-the-box thinking. Combining her love for children, education, and creativity, she runs events at camps, schools, parties, and venues of all sorts, creating a warm, enriching and fun environment where children feel safe to explore and grow their creativity. Mushky is the founder of Parsha Pop Up, currently used in over 60 schools, and the creator of On a Roll Crafts.
With just a few basic materials you can create a personalized and impressive card that is sure to leave a lasting impression. Mushky will guide you through each step of the process, sharing helpful tips and tricks along the way to ensure your card is picture-perfect.
Whether you're a beginner or an experienced crafter, our tutorial is designed to help you add a personal touch to your birthday greetings. Show your loved ones how much you care with a handmade card that truly pops! Don't forget to like, comment, and subscribe for more fun and creative crafting ideas.
Supplies:
-2 colored card stock papers
-scissor
-glue
-markers
-stickers (optional)
Step 1: Fold 1 paper in half
Step 2: Cut 2 slits on the folded edge of the paper, approx 2 inches long and 2 inches apart
Step 3: Pop out the square to form a pop-up
Step 4: Cover the square with a different color paper to make it stand out
Step 5: Cut and paste 2 thin strips of colored paper to form a "ribbon" on top of your gift box
Step 6: To form a bow, either glue a pre-made bow or ribbon or create one using colored paper
Step 7: Write "Happy Birthday" using markers or stickers. You can also add other designs or decorations as desired.
Step 8: Glue the 2nd paper to the back of the pop up card to cover the slits and create a clean finish.
Step 9: Don' forget to subscribe to "onarollcrafts" for more awesome craft content!
Mushky, aka the Duct Tape Lady is a craft enthusiast and imagineer. With 15 years of classroom experience, she recognizes that crafts build confidence, teach problem-solving skills, and encourage out-of-the-box thinking. Combining her love for children, education, and creativity, she runs events at camps, schools, parties, and venues of all sorts, creating a warm, enriching and fun environment where children feel safe to explore and grow their creativity. Mushky is the founder of Parsha Pop Up, currently used in over 60 schools, and the creator of On a Roll Crafts.
You can check out more awesome projects on the
new website, onarollcrafts.com,
or her YouTube channel, OnARollCrafts,
or follow her on Instagram.
Bookings for live and virtual workshops, parties and sponsorship, email: info@onarollcrafts.com
Monday, March 13, 2023
Napkin Decoupage Art for Beginners!
Napkin decoupage is a lot easier than you think! Just a tiny drop of patience and determination and you will be a decoupage pro in no time! Great for decorating any jewelry box or Seder plate! https://youtu.be/fkamHmSR0QU
Supplies:
Anything wood or glass
Scissor
Napkin
Mod podge
Step 1: place a thin layer of mod podge on your wood item.
Step 2: separate and discard the 2 extra layers from your napkin.
Step 3: place your thin napkin on top of the mod podge
Step 4: place another thin layer of mod podge on top of the napkin and let it dry overnight.
Step 5: subscribe to “onarollcrafts” for more awesome craft content!
Supplies:
Anything wood or glass
Scissor
Napkin
Mod podge
Step 1: place a thin layer of mod podge on your wood item.
Step 2: separate and discard the 2 extra layers from your napkin.
Step 3: place your thin napkin on top of the mod podge
Step 4: place another thin layer of mod podge on top of the napkin and let it dry overnight.
Step 5: subscribe to “onarollcrafts” for more awesome craft content!
Thursday, January 19, 2023
Perfect Tu B’shvat Craft!
Cutest Flower Pot Faces | Planter Pot Face | DIY Pot People | Plant Decor Ideas
With Tu B'shvat coming up, let's get planting! But why would you put your plant in a regular boring flower pot when you can put it in an adorable pot with personality:)
Supplies:
Flower pot
Saucer (plate)
Small wooden ball
Googly eyes
Fake lashes
Glue Gun
Paint
Permanent markers
Dress up decor (ex:glasses, earrings, pearls, bow)
Step 1: glue gun the small round ball to the middle of the flower pot
Step 2: paint the pot and saucer
Step 3: attach googly eyes and lashes
Step 4: add in the rest of the face (mouth, beauty mark) with paint or permanent marker
Step 5: have fun dressing up Mrs. or Mr. Pots!
Step 6: subscribe to “onarollcrafts” on youtube for more awesome craft content!
With Tu B'shvat coming up, let's get planting! But why would you put your plant in a regular boring flower pot when you can put it in an adorable pot with personality:)
Supplies:
Flower pot
Saucer (plate)
Small wooden ball
Googly eyes
Fake lashes
Glue Gun
Paint
Permanent markers
Dress up decor (ex:glasses, earrings, pearls, bow)
Step 1: glue gun the small round ball to the middle of the flower pot
Step 2: paint the pot and saucer
Step 3: attach googly eyes and lashes
Step 4: add in the rest of the face (mouth, beauty mark) with paint or permanent marker
Step 5: have fun dressing up Mrs. or Mr. Pots!
Step 6: subscribe to “onarollcrafts” on youtube for more awesome craft content!
Sunday, December 04, 2022
Duct Tape Dreidel Pouch | A Chanukah Craft
This duct tape dreidel Chanukah craft can hold all your gelt.
When you win make sure you put that gelt in your Chanukah dreidel pouch.
This simple craft is a fun Chanukkah diy for any age.
Subscribe to “onarollcrafts” for more awesome content!
When you win make sure you put that gelt in your Chanukah dreidel pouch.
This simple craft is a fun Chanukkah diy for any age.
Subscribe to “onarollcrafts” for more awesome content!
Enter contest on www.instagram.com/onarollcrafts, see detail below.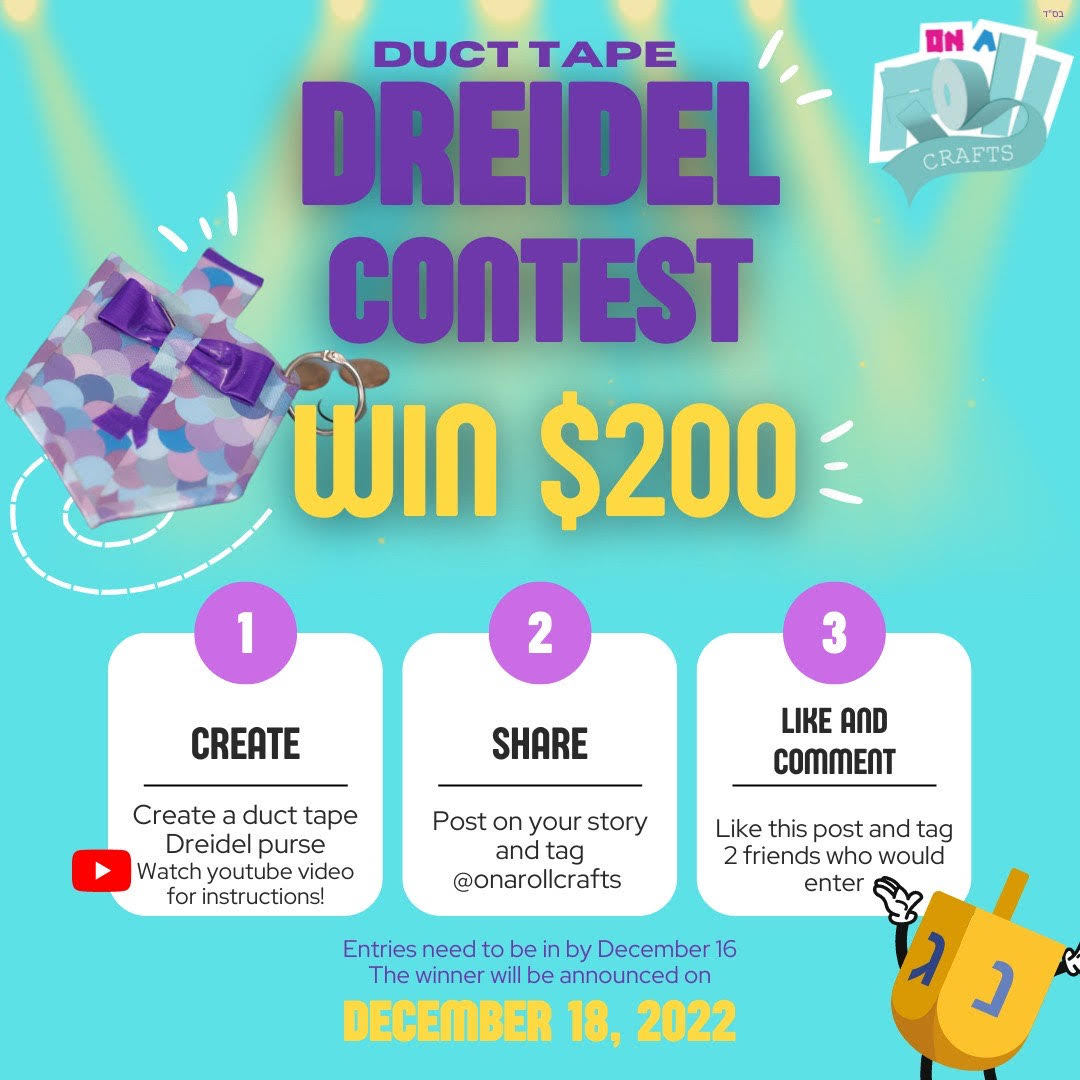

Friday, November 18, 2022
Recap on 5 Chayei Sara Crafts!
Camel Handprint! Make a handprint Camel to resemble the 10 camels Eliezer brought with him to find a wife for Yitzchok!
Monday, November 14, 2022
Well Craft for Parshas Chaya Sara!
Well, well, well, what craft do we have in store today? We all know the story of little Rivka getting water from the well, how cool would it be to create your own 3D well.
Supplies:
Regular size popsicle sticks
2 jumbo popsicle sticks
Mini half size popsicle sticks
Empty roll of duct tape
Glue or glue gun
2 pieces of cardboard (4 x 5 inches)
Fake flowers
Fairy lights (optional)
Step 1: remove all duct tape from the roll until the roll is bare and "cardboardy".
Step 2: glue the regular size popsicle sticks around the empty tape roll.
Step 3: glue the 2 jumbo popsicles sticks to both inner sides of the well.
Step 4: fold 1 cardboard square in half and glue mini popsicle sticks on both sides. Shape it like a roof.
Step 5: Glue the roof on top of the well by securing it to both jumbo popsicle sticks
Step 6: trace a circle onto the 2nd piece of cardboard, cut it and glue it to the bottom of the well as a base
Step 7: now for the fun! Decorate your well with flowers and vines. Add the fairy light for an added magical touch!
Step 8: Subscribe to “onarollcrafts” for more awesome content!
Supplies:
Regular size popsicle sticks
2 jumbo popsicle sticks
Mini half size popsicle sticks
Empty roll of duct tape
Glue or glue gun
2 pieces of cardboard (4 x 5 inches)
Fake flowers
Fairy lights (optional)
Step 1: remove all duct tape from the roll until the roll is bare and "cardboardy".
Step 2: glue the regular size popsicle sticks around the empty tape roll.
Step 3: glue the 2 jumbo popsicles sticks to both inner sides of the well.
Step 4: fold 1 cardboard square in half and glue mini popsicle sticks on both sides. Shape it like a roof.
Step 5: Glue the roof on top of the well by securing it to both jumbo popsicle sticks
Step 6: trace a circle onto the 2nd piece of cardboard, cut it and glue it to the bottom of the well as a base
Step 7: now for the fun! Decorate your well with flowers and vines. Add the fairy light for an added magical touch!
Step 8: Subscribe to “onarollcrafts” for more awesome content!
Friday, October 28, 2022
Must Try - 3 Awesome Parshas Noach Science Experiments
Supplies:
Food coloring
Cup
Dish soap (not detergent)
Water
Dish cloth/ sock
Rubber band/ pony tail
Plate/ bowl
Spoon
Step 1: place 2 teaspoons of dish soap in the bowl/ plate
Step 2: pour a 1/2 cup of water in the bowl and mix
Step 3: make a hole on the bottom of the cup
Step 4: lay the wash cloth or sock on the opening of the cup and wrap the ponytail around both the wash cloth and the cup.
Step 5: create colorful dots from food coloring around the wash cloth.
Step 6: place the cup in the soapy water for 5 seconds
Step 7. blow as hard as you could into the whote in the cup to form a magnificent bubble rainbow!
Sunday, October 23, 2022
Fun Hand Drawings Using Your Hand as the Stencil!
Noach’s Ark had so many animals, how fun would it be to draw a few using your hand as the stencil?!?
Supplies:
Paper
Markers
Your very own hand
Instructions
Goose:
Step 1: Place your index finger on your thumb keeping the rest of your fingers parallel to your index finger.
Step 2: Place your hand including some of your arm on the paper
Step 3: trace your hand using a marker/ crayon
Step 4: fill in the face of the goose by adding a beak and eyes.
Step 5: color in the beak and Vwalla!
Giraffe:
Step 1: Tuck your middle finger under your palm while spreading apart the rest of your fingers
Step 2: place your hand including your arm on the paper
Step 3: trace your hand and arm using a marker/ crayon
Step 4: fill in the rest of the giraffe by adding ears, eyes, mouth and spots!
Step 5: Beighten up the giraffe with color and Vwalla!
On A Roll Crafts by Mushky. Mushky is a craft enthusiast and imagineer. She has been a classroom teacher for 14 years and is an adjunct professor at Sara Schenirer College. Mushky knows that students who feel loved and cared for by their teachers are able to grow and flourish academically as well as socially. Combining her love for children, education and creativity she creates a warm, enriching and safe environment where children feel free to express themselves and grow to their full potential. Mushky is the proud founder of Parsha Pop Up which is used in over 50 schools and the creator of On a Roll Crafts.
Supplies:
Paper
Markers
Your very own hand
Instructions
Goose:
Step 1: Place your index finger on your thumb keeping the rest of your fingers parallel to your index finger.
Step 2: Place your hand including some of your arm on the paper
Step 3: trace your hand using a marker/ crayon
Step 4: fill in the face of the goose by adding a beak and eyes.
Step 5: color in the beak and Vwalla!
Giraffe:
Step 1: Tuck your middle finger under your palm while spreading apart the rest of your fingers
Step 2: place your hand including your arm on the paper
Step 3: trace your hand and arm using a marker/ crayon
Step 4: fill in the rest of the giraffe by adding ears, eyes, mouth and spots!
Step 5: Beighten up the giraffe with color and Vwalla!
On A Roll Crafts by Mushky. Mushky is a craft enthusiast and imagineer. She has been a classroom teacher for 14 years and is an adjunct professor at Sara Schenirer College. Mushky knows that students who feel loved and cared for by their teachers are able to grow and flourish academically as well as socially. Combining her love for children, education and creativity she creates a warm, enriching and safe environment where children feel free to express themselves and grow to their full potential. Mushky is the proud founder of Parsha Pop Up which is used in over 50 schools and the creator of On a Roll Crafts.
Subscribe to:
Posts (Atom)